Greybeard!

So this morning I’m cruising along towards Putney Bridge on the Falcon fixie, feeling pretty good, doing a nice pace and feeling like I have plenty in reserve. I get to the red lights and wait at the line. Then some older solidly built bloke with a big bushy grey beard of about 50 pulls in in front of me on a hefty looking touring bike, panniers, big tyres, disc brakes, more mountain than road in style. A typical older bloke’s bike, dare I say it (at the youthful age of the wrong side of 40).

Due to the size of his bike, I thought he would be a challenge to get past when the lights went green. So, green light, off goes greybeard and off I go. He was pretty sprightly, to my surprise, up that hill onto the bridge. Being fixed and with toeclips I take off a bit slower, so I had to catch him up – I got past him near the crest of the bridge and thought nothing more of it.

Ten minutes later at Kings Road, near Edith Avenue, after a pretty speedy run, there is greybeard, having caught me again at the red lights. He did pretty well. Red light, about to change, so like a lot of twats he goes a few seconds ahead of the green. Green light, the rest of us take off, including quite a few speedy looking riders on decent road bikes. It’s level this time and greybeard is nailing it, leaving the rest of us behind. I am not having this, I thought, he’s making me look fat, slow and ridiculous on his massive tourer. So I nailed it too, passed him like a bat out of hell and half a mile later I damn near rear ended a van which stopped for a random pedestrian running through the traffic. At this point the greybeard catches me up again, doing a fair pace and not even pedalling!

Only then did I see his square electric battery pack. The bloody thing was electric.

Singlespeed Project – 6 months on

The Falcon hit the road some time back and I’ve never really looked back. I have a few other projects on the go and arguably never quite finished this one but she’s great to ride and I’ve racked up a good many commuter miles on her.

Falcon Olympic Fixie

Falcon Olympic Fixie

The final spec is a bit different from what I anticipated, so here is the detail:

  • Falcon “Olympic” steel frame and forks, Reynolds 531 tubing, (approx 1971)
  • Token 102mm ISO bottom bracket (45mm chainline)
  • KMC z610HX chain
  • Suntour Superbe Pro cranks with Velosolo 48t 3/16 chainring and Campagnolo bolt covers
  • Mavic Open Pro rims with Suntour Superbe Pro hubs, Sapim DB spokes
  • GB 70mm Hiduminium stem
  • Dawes drop bars
  • Tektro RL341 brake levers
  • Alhonga “mid-drop” 57mm front dual pivot brake caliper + Acor “deep drop” 73mm rear brake caliper
  • MKS GR-9 pedals
  • Generic steel 17t screw on cog with 24tpi (bottom bracket) lockring
  • Zeus steel headset
  • Lycett L’Avenir leather saddle
  • Fluted seatpost (I now think it is original as I’ve seen another)
  • Michelin Dynamic 700-25 tyres
  • SKS Bluemels mudguards for winter.

Suicide Hub

Suicide Hub

After the usual “fettling in” period, a few component swaps (3TTT stem was too long, plus it did not actually grip the old Dawes bars properly), I have really just ridden this bike. A 20 mile round trip commute most days is a good way to learn riding fixie. The frame is tight and runs silky smooth over rough London roads, and she is so bewitchingly light and fast.

I had a brief flirtation with a 16t rear cog, taking my gearing to 48:16 from 48:17. It may have been a bit faster on a downhill but on the flat I think there wasn’t much in it, plus it was joyless up hills so I swapped back and I’m satisfied that 48:17 is right for me.

Superbe Pro + Velosolo Crankset

Superbe Pro + Velosolo Crankset (I really must polish it...)

I chucked out the cheap brake pads that came on the cheap brakes and have re-used some spare Campagnolo pads I had, they are so much better and don’t cover the wheels in crap.

I never did paint the frame, it’s still covered in rubbish Hammerite, but I like the “ghetto” look for now. I think also it looks less appealing to thieves. I hope so. I have now got a reproduction Falcon Olympic head badge (decal) so I will think about new paint this summer.

And finally, I got the most beautiful Lycett L’Avenir leather saddle. It was on eBay and not being Brooks didn’t get many bids. It looked old and worn in the photo and when it turned up it was pretty hard, but I conditioned it (Brooks Proofide) and have ridden it through the winter, and now it is polished up to a deep rich mahogany. It is also incredibly comfortable. You’d never believe I paid £11 squid for it.

Lycett L'Avenir

Lycett L'Avenir

The Falcon Flies Again!

At last I found some time to get the Falcon singlespeed on the road. I still have  a few details to sort out, not least of which is repainting the frame, but I decided to build it up initially as it stands, with the rough light blue Hammerite paintjob I bought it with. Perhaps strangely, I think it has character. And with all the shiny new and reclaimed components it looks good too.

Falcon Olympic Fixie

Falcon Olympic Fixie

I had a few jobs remaining to do to get it on the road. In roughly this order: build back wheel, fit headset, fit bottom bracket, cranks and pedals, sort chainline and fit brakes, stem, bars, wheels, tyres, saddle and seatpost.

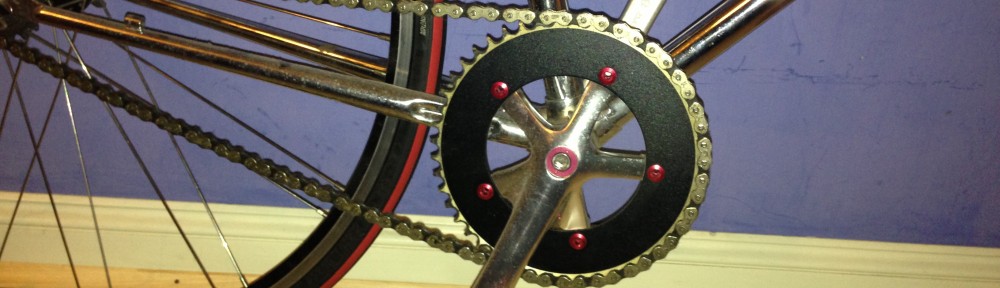
I built the back wheel last weekend (Superbe Pro hub, Mavic Open Pro rim, Sapim Race double butted spokes). I’m getting the hang of wheel building and it was much easier doing this than the front wheel. To the completed wheel I fitted a 17 tooth Gusset steel fixed cog from Charlie the Bikemonger, who also supplied the KMC Z610HX chain. It’s well shiny and really sets off the polished metal on the bike.

I then set about getting the chainline right. I assembled the Campy bottom bracket (112 mm) into the frame, then fitted my Suntour Superbe Pro cranks with the Velosolo 48 tooth chainring. With the wheel in place I could see first of all that I had the rim nicely centred for the frame, but also the chainwheel was sitting out from the cog by about 5mm.

As there was plenty of clearance on the frame I figured a narrower bottom bracket would be fine. To get 5mm closer I needed a 10mm narrower bottom bracket. It needed to be English threaded with ISO taper. And not too pricey. Plus it needed a good deep threaded section on the cups as my bottom bracket shell is pretty worn on the drive side with most of the outer thread badly worn.

Drivetrain

Drivetrain

So, I shopped about and settled on a Token. I was trying to find a steel shelled BB like the campy, so that the few threads in use on the drive side would be nice and strong, but no luck. Token offer a wide range of sizes and configs, and they all fit using a Shimano spline pattern which is useful, although you can get a better grip for fitting on the Campy design.

I was going to get the BB from Velosolo, the service there is great and they are clearly very knowledgeable, but Wiggle had the same BB for about £5 cheaper (£17.99 with free postage) so I sold out to the big guys on this one. However it took over a week to arrive, so that served me right.

When the Token BB arrived I took a good look. It has nice smooth running bearings and it’s double sealed with a carbon shell. For a budget BB it’s light and apparently well made with an expensive looking finish to it. Usefully for the Falcon frame the threaded section on the cups is very deep, around 17mm each side (compared to 12mm for the Campagnolo bottom bracket or even 8mm for an FSA). On the drive side of my frame, about the first 7mm of thread is damaged but this deeper cup is biting into another 5-6mm of good undamaged thread which seems enough to hold it very firmly. On the flip side however, the depth of the threaded section may make the cups difficult to fit in some frames – in fact on my non drive side I re-used an old steel FSA shell because the aluminium thread was binding for the last 5mm in the previously unused inner section of thread on the frame.

Once the narrower BB was fitted the chainline came up very good, with only about 0.5mm offset which I am sure it can tolerate easily. Aesthetically it works better too, holding the cranks nice and snug into the frame. In fact it just lightly touched the chainring bolts against the frame but a technical tap with the big ball peen hammer onto the chainstay sorted that in no time.

Headset

Headset... and the rest

So, next challenge the headset. I bought a Genetic Cranium alloy headset (1″ threaded) from SJS a while ago for a tenner. Brilliant value and nicely finished too. I loosely fitted it hand tight at the time and it seemed OK. I left it set up like that just to keep the frame and forks together for mounting bits up on.

On the weekend I went to fit it properly, grease the bearings and tighten it but I couldn’t get it right. It was either too tight and binding or too loose and wobbling. I noticed to my escalating concern that the lower cup that presses into the head tube was loose. Surprisingly loose in fact and could distinctly be moved about. This then would explain the problems.

Now the old Falcon frame has clearly had a hard life. The bottom bracket shell is not the best. The paint on the frame has been stripped and badly repainted in Hammerite which has itself been knocked about. I really only bought it because it’s built with Reynolds 531 steel, I like the lugs and the look of it and the seller suggested it was 10 years older than it really is (hell, it looks 50 years older than it really is!). It’s had a very hard life so it sort of makes sense that it might have been brutalised in other ways too but this is a real bummer to have the head tube worn like this. I could only assume it had been ridden for a long time with a loose or worn out headset which set up a “hammer blow” effect inside the head tube, leading to its eventual distortion.

Sorely disappointed, I seriously considered scrapping it and getting a better frame. But on reflection I decided to see about getting it brazed and reamed out in the longer term, and to see if I could use a “coke can shim” in the short term, perhaps with some JB Weld.

In the meantime, my wife’s Ron Kitching bike has a badly fitted Zeus headset (also 1″ threaded) – the top nut can’t get enough thread to lock down onto the lower nut so clearly the stack height is wrong. So I read around and saw that Tange headsets, besides being notoriously good, also have a low stack height. But before trying one I thought I would try the Genetic Cranium headset which clearly wasn’t right in the Falcon. By luck it fitted the Kitching frame perfectly. One problem solved at least.

So I took the old Zeus headset from the Kitching which although old is clearly in good nick. Being steel I thought it might be a slightly better, if heavier, candidate for any bodge work required on the Falcon.

To my surprise it was a very good fit into the Falcon’s head tube, tight enough to require a good hit with the trusty heavy ball peen and a block of wood. (I had noticed the Cranium slipped easily into the Kitching but it still needed a tap to get it home). So nothing wrong with the head tube after all. Massive relief. All it needed now was a 5mm x 1″ alloy spacer (£1.99 Brand X from Chain Reaction) and the headset is now spot on.

That was the last hurdle crossed. Now I fitted the wheels, the KMC chain, the stem and the lovely old Dawes drop bars I got a while ago. Suddenly she was looking like a proper bike. All it needed was pedals and a saddle, and I had already ordered the former.

Next morning the pedals arrived, MKS GR-9 from Velosolo. Fast service as usual. I still didn’t have a saddle yet so I used the crap one that came on the Kitching and was now spare. I fitted a pair of toeclips (Italian made, old stock from Spa Cycles). Brakes could wait till later I decided.

Falcon ready to fly

Falcon ready to fly

I took her out for a little ride down the road. A slight battle with the toeclips (damn pedals were a moving target – I forgot to say, I’m a fixie virgin) but everything else fine. So quiet, smooth and she looks brilliant. I’m going to need a bit of practice before doing the 10 mile commute to work however.

Replacing Cartridge Bearings on a Suntour Superbe Pro hub

I bought the wheels for my Singlespeed project on eBay primarily because they were cheap and came with fantastic Suntour Superbe Pro hubs. I am now rebuilding these hubs into new clincher rims. But first I need to replace the rear wheel bearings as one is a little bit gritty.

The Suntour Superbe Pro was reputedly the first mass production high grade hub to be fitted with “off the shelf” sealed cartridge bearings. This makes them first of all very long lasting and secondly very serviceable. There was a bit of discussion on a web forum I saw a while ago which suggested that the bearings fitted were a slight variant from the standard of that type and that some work would be required to make the generic replacement fit. Well that doesn’t seem to be the case unless it’s already been done on mine which I doubt.

The bearings fitted were IKS 6001RV. Good quality Japanese made bearings. I highly suspect they are original. I looked the 6001 up on t’Interweb and found the FAG equivalent bearings at a decent price at Gap Bearings. If FAG can make bearings good enough for Volkswagens and railway locomotives, they can make them good enough for my bike.

I wasn’t 100% sure I had the right bearings but it was only a few quid. When they turned up I visually compared them and the certainly looked correct. The next hurdle was to remove the old bearings. I’ve done this on cars and it’s simple enough, you either get a puller to fit and pull them out, or you knock them through from the other side. A puller would have to be small and I don’t have one that size. So knocking them through seemed to be the best plan. Unfortunately the hole through the middle of the hub is only just bigger than the axle so it’s hard to get anything bigger through, and also it’s hard to get any angle on it which means you can’t get any purchase behind the bearing to knock it out.

I tried with a longish engineering bolt I had but it kept popping out, it was too springy when hit. I didn’t have a lot of luck so began to think about maybe tackling that another time and just riding it with the gritty bearing, after all it wasn’t too bad (yet).

Specialist bearing removal tools

Specialist bearing removal tools

Yesterday I was tinkering with one of my other bikes and I pulled out my old toolkit from the shed which I keep as a spare set. It’s full of crap from 30-odd years of tinkering with stuff and when looking for a small washer in the junk at the bottom I pulled out an old pushrod. I’m pretty sure it’s from a 1970’s triumph 2500 motor as I used to have a few of these. It is thin, high grade steel with a lovely hardened machined end with a distinct hard ridge. It looked promising.

Just in case that didn’t work I also found an old 7″ galvanised steel nail (more like a spike) which was a type we used to use at my grandmother’s farm for attaching gate brackets onto green timber posts. The head on this looked a possibility but being rounded would have to be ground flat first.

Punching out the bearing

Punching out the bearing

I tried the pushrod first. I had to cut the rounded (tappet) end off it so I could fed the thin part of the shaft through the hub. The rocker end has the flat surface I described and it just fitted through the bearing centre and neatly tucked behind it on the drive side of the hub. This was the gritty bearing so the one that most had to come out. A couple of whacks with my big hammer over some blocks of wood and it was out. Easy peasy.

Now for the other side. The pushrod didn’t fit as there wasn’t enough space behind the bearing for the rather deep head to drop into. So I ground down the head of the 7″ spike to get it near flat and then fed it through. The grip wasn’t as good as the pushrod on the other side but it seemed firm enough. So I gave it a firm hit (as Sheldon once quoted “If brute force doesn’t work, you’re not using enough!”) and it moved. a second hit and it was out.

Old and new bearings

Out with the old, in with the new...

Great, both sides clear. I wiped the hub down and it was in perfect order. I compared old and new bearings and they were identically sized.

New bearing ready to fit

New bearing ready to fit

Putting bearings in is about 10 x easier than taking them out. A block of wood under the hub, the bearing positioned in place, a block of wood on top and a firm hammer hit and in it went. The first knock put it in slightly crooked so I knocked it straight with the second. Once it was flush with the top of the hub I sat the old bearing on top to use it as a drift, put the wood on top of that and knocked it home, a few mm below the surface.

Repeat on other side, wipe it down, fit the axle, job done.

It’s a testament to the quality of the design and finish of the Superbe Pro hubs that the new bearings were so easy to fit.

Knocking the bearing in

Knocking the bearing in

As part of the manufacturing process Suntour thoughtfully machined a recess into the top of the bearing housing just fractionally larger than the housing proper. This allows the new bearing to drop into it’s intended location about 3mm or so which means that hitting it the rest of the way home is much more trouble free as it’s definitely in the correct position. So many bearing housings do not have this feature and as a result it is possible to damage the bearings or the housing by being careless or unlucky.

Using old bearing as a drift

Using old bearing as a drift

If you think about it, it’s an unusual manufacturer that thinks about a maintenance job that is probably a decade away in most cases. With an eye on cost, and a focus on selling new stuff, no sensible company would deliberately add cost to their manufacturing process just to make maintenance down the line easier. In fact they have a disincentive to do so as fixing old stuff might hurt new sales. But Suntour were notoriously poor at marketing and good at engineering. In the end it was their downfall. Where Shimano has a policy of charging what the market will bear for admittedly very good kit, Suntour preferred to sell on a cost plus basis. This often positioned their kit as cheaper than Shimano in the marketplace, which ironically led to it being considered “not as good” as Shimano. In some cases that may have been justified but for their high end stuff they were as good as anyone in the market, and sometimes better.

New bearing correctly seated into housing

New bearing correctly seated into housing

Next: disassemble the old wheel and rebuild it with new spokes and rim.

Singlespeed Part 6.1: Wheel Rebuild

Well I bought the spokes. Sapim Race double butted 290mm. I got 32 of them for the front wheel plus a couple of 286mm Sapim Strong (single butted) spokes as I wanted to try them for size on the rear and check the 2.3mm heads would fit in the rear hub. I bought them from Spa Cycles in the end as they offer Sapim spokes with nipples at a decent price. Service was brilliant – next day – and they put in a couple of extra spokes as well which is a nice touch.

So, I got the spokes, the rim and the wheel out. I dismantled the old wheel, put the rim to one side and bundled up the 300mm spokes I had removed. They may come in useful in the future. I cleaned up the hub and it gleamed like a new one. You can really see the quality in the finish of these Superbe Pros.

So, following my guides (Sheldon plus Zinn and the Art of Mountain Bike Maintenance) I started lacing up. I took care to make sure I lined up the logo on the hub with the valve hole. I did my first set of spokes, using the old spoke marks in the hub as a guide as well as the instructions. So far so good, it looked just like in the pictures.

Second set of spokes

Second set of spokes

Second set of spokes. I dropped them through as instructed, again following the old hub marks as a sanity check. I flipped the wheel over and started to lace. Damn. I realised I had not allowed enough for the rotation of the wheel and the valve hole no longer lined up. Sod it, I thought. Got to do this properly so I unlaced everything and started again, moving the hub 2 spokes around.

So, starting again. This time I added a piece of electrical tape to the right side of the rim as a marker so I didn’t accidentally swap left and right. First set. So far so good. Second set. not a problem. Valve hole lined up about right, won’t really see it till tensioned but it’s very close.

Third set, now we’re getting tension. Hang about, I’m half way round and getting a LOT of tension on the spokes. This doesn’t seem right, they should still be loose. I checked the lacing pattern, re-read both Sheldon, Zinn and various others. Stopped pouring wine and started to worry a bit. I could not find anything wrong with my lacing pattern so the only conclusion was that I was significantly wrong on the spoke length.

I went back to Spocalc and re-checked everything. Yes, there it was, 2 cross, 290mm. 3 cross, 294mm. I’m doing 2 cross right? No. All the instructions are for 3 cross. And 3 cross is pretty much the “standard” lacing and was actually my intention.

So how did I go wrong? Well lack of attention to basic detail I must admit. I looked at my wheels originally and counted the crosses. 1, 2. So 2 cross. But no, I hadn’t counted the little one right close into the hub. I didn’t think that one DID count. Bummer.

So. I have a bunch of used spokes. Spa said they’d exchange unused spoked but these have been greased, twisted and laced in and out of a wheel a couple of times. I don’t believe in taking the piss so I’m stuck with these. OK. It’s a front wheel so why not lace 2 cross?

I Googled 2 cross and sure enough, it’s not uncommon on front wheels in particular, although less common with 32 spoke, more common on 20 or 28 spoke. The Sheldon instructions had some corrections for 2 and 4 cross but were surprisingly unclear on the details. As far as I could work out, on the trailing spokes, instead of going 5 holes around the rim it was 3 holes. So I did that and it seemed to work.

2 Cross - loosely laced

2 Cross - loosely laced

OK, press on. 3rd run, following my revised pattern. 4th run, likewise and looking good. Fantastic, I had done a 2 cross on dodgy instructions and a bottle of wine for my first ever wheel build. Genius. Let’s put it on the truing stand and start to tighten it up.

On the truing stand I gave it a spin. Yes that looks like a wheel. But not right, yet. Start to tighten spokes working steadily around the wheel. Second time round and some spokes are getting tight. Hmm, well I guess that happens as it pulls the wheel into shape. It looks OK so press on.

No. There’s still something wrong. I looked everywhere for a 2 cross pattern, I must have mine wrong. It looks a bit odd and clearly some spokes are much tighter than others.

1.30 am. Knackered. Confused. Pissed off. Give up and go to bed.

Next day, I got up, made some coffee and though again about the wheel. I had looked everywhere for a decent diagram or image of a 2 cross wheel. There was one right in front of me, on the back of my wife’s Bianchi. Granted it’s a 28 spoke Shimano wheel, But it’s definitely 2 cross.

I took the wheel out, lined it up with mine and scratched my head. I had looked at patterns too long and they all looked like spiderwebs now. I was baffled. I asked my wife to look and she told me yes, the pattern was correct. So why the wonky spokes?

In the end the penny dropped. The wheel had been rebuilt once already, hence the mixed spokes and the Ambrosio rim. On the second rebuild they flipped the hub around and used the opposite spokes. This put marks on both sides of the spoke holes but given the grade of the hub the marks are quite faint. When I laced my second group I missed the correct hole and followed what looked like the correct mark, aligning one side a hole out of sequence at the hub.

So, to fix that I worked out which direction the centre holes had to be moved. It was anticlockwise on the right side. I loosened all the spokes the the last few threads. I then removed one spoke, taped over its hole in the rim and put it to one side. I took the next spoke around (at the hub), and removed it. I then relaced it to the same rim hole but into the vacant hub hole left by the original spoke I had removed. I then did this all the way around the wheel, each time removing the spoke next clockwise around in the hub from the vacant hole, then replaced it into that vacant hole, leaving the next one round vacant, and so on.

Eventually I was at the last spoke. The next one was the one with the tape on the rim so at that stage I replaced that spoke. I then proceeded to tension the wheel evenly, and it trued up beautifully.

Job done.

2 cross 32 hole 700c wheel

Completed 2 cross 32 hole 700c wheel

Singlespeed Project: Taking Stock

Right… it’s all got a bit mad lately. What with drunkenly buying tandems, rescuing bikes from trees, plus giving the commuters some TLC before winter hits us I almost can’t keep up. On top of that the bike I thought was a Carlton, then a Dawes is actually, really truly, a Falcon. The more I think about that the more I like it. I just find Dawes as a brand to be a bit bland and unexciting. The lovely frame I had seemed an unlikely Dawes indeed.

The Mavic Open Pro rims arrived from Chain Reaction today. They look stunning in silver and I now see what they mean about the double eyeleted spoke holes. The eyelet extends through the outer skin of the rim and attaches to the inner skin. This means that the spoke will pull directly on the inner and outer skin together, probably twice as strong as just eyeleted to the outer skin.

Anyway, so where am I with the project? I have:

  1. Frame + forks. In need of paint stripping and a respray, plus the rear brake bridge is a bit squashed out of shape but should knock back to round. But fundamentally sound.
  2. Hubs. Suntour Superbe Pro 32H (still attached to tubular rims). Separated from freewheel and set up with a fixed 14t sprocket and locknut.
  3. Cranks. Suntour Superbe Pro. Still attached to worn Sugino double chainrings but in excellent condition.
  4. Bottom Bracket. Campagnolo. Correct thread for frame and confirmed correct taper for the cranks.
  5. Rims. Mavic Open Pro 32H silver. Brand new and ready to assemble.
  6. Stem. 3TTT 1″ threaded alloy stem (NOS).
  7. Bars. Dawes alloy drop bars. Confirmed correct fit for the 3TTT stem and already assembled.
  8. Headset. New Cranium alloy 1″ threaded headset. Already loosely fitted to bike.
  9. Seatpost. Fluted alloy seatpost – came with bike. Probably not original but looks nice. Keep.
  10. Brakes. I have the Acor long reach rear double pivot brake and also an Alhonga front brake which looks similar (got it very cheap on eBay).
  11. Brake levers. Old Weinmann alloy levers.
  12. Stainless steel inner brake cables.

I need to get:

  1. Spokes. I need 64 new spokes. Probably Sapim, about 35p each. Also need brass nipples. That sounds all wrong…
  2. Chainring. I’ll get a 44t 1/8″ polished alloy VeloSolo track chainring 130mm BCD.
  3. Sprocket. I used Sheldon’s calculator to work out that with 44t on 700c rims I probably want a 16 or 17 tooth rear sprocket. I’ll buy one of each in cheap steel from VeloSolo (about £4) and try them out. When I am satisfied I’ll probably get a better one.
  4. Chain. Get a SRAM or KMC 1/8″ chain. Probably. There seem to be some specialist chain producers in this niche that get a following.
  5. Saddle. I’d like a Brooks but for now it may be a cheapie.
  6. Tyres. Still got to get these. I fancy gumwalls for the retro look. I have loads of spare 700c inners although I may want to get some “puncture proof” ones with goo in them for commuting.
  7. Cable housings. Need front and rear cable housings for the brakes (need a rear too as my fixie isn’t a proper locking one). Might go for coloured or white, probably depending on handlebar tape.
  8. Bar tape. Not decided on colour (depends on frame and saddle).
  9. Paintjob. This will be last… I’m gonna build it as it is, rinde it a bit and get it all completely sorted, then strip it back, do the frame and reassemble.

Not too much to get now…

Singlespeed: The Chameleon

Well… first it was a “Franco-Suisse”. At least that’s what the eBay seller said it was. Then I thought it was a Dawes. Now it’s a Falcon…. yes… a Falcon…

Mystery Head Badge remnant

Mystery Head Badge remnant

I’ve been baffled a bit by the head badge ever since I got this frame. It’s been completely bare-metalled and repainted in Hammerite using some sort of blunt instrument, so there are absolutely no identifiers on it other than the broken off head badge. When it arrived we quickly realised the bike was not a Carlton (Franco-Suisse) as their head badges are riveted left and right not top and bottom.

Also it shows a distinctly recognisable bunch of flames – the top part of an Olympic torch. I trawled head badge images and was convinced in the end it was a 1960’s Dawes badge thus identifying the frame as a classic Dawes. But I could not find an image of any similar Dawes frame on t’Internet nor anyone who recognised it. In particular I never found a Dawes with the wraparound rear stay like my frame has.

Undeterred, I managed to buy a “flaming torch” Dawes head badge on eBay to replace my broken one but it didn’t quite line up. I assumed it was a slightly different vintage but it seemed very believably similar.

Tonight, after slightly too much wine, my wife was trawling eBay looking for a classic bike frame for her and we saw an old Falcon, beautifully done up as a singlespeed. I spotted the head badge and it was this…. unbelieveable. It really is exactly the same from the top rivet up as my snapped off badge. And Falcons seem to go in for the wraparound rear stay on my bike that I think is so attractive.

Wraparound stay

Wraparound stay - Falcon Olympic

So, on the whole I’m OK about that. I had wanted a sporty frame with attractive details and it is that – Falcon evidently have a rather sportier heritage than Dawes anyway.I have now trawled further and found a set of photos on a forum that, at last, clearly identifies my frame. Evidently it is a Falcon Olympic, probably from the early 1970’s (although the year is not yet verified).

The bronze coloured one here is the same frame, same lugs, cutouts, everything. Funny thing is, I was originally thinking of maybe a bronze or a gold colour for it when I get it painted. I might just copy that colour.So, I now know that the Falcon Olympic was apparently manufactured with straight gauge Reynolds 531 tubing, hence it is not as light as a butted 531 frame (which I had already figured). But still a reasonably light and strong steel frame, which seems to have been specified with good quality compoents if not the absolute top end. And I really like the lugs…

Falcon Olympic - stay and lug detail
Falcon Olympic – frame detail

I do have some slight disapppointment as I had wanted to get a bike older than me and this one is not. And the Franco-Suisse (Carlton) dating from around 1960 seemed to be reminiscent of a more bygone era. But this bike does seem to date from Falcon’s peak which was early to mid 1970’s so that’s quite something. But hey-ho. This will be a fun project and I’m just going to make it a good bike rather than bothering with authenticity. It’s been too much stripped and unloved for that. At least now it has its identity back.

Singlespeed Part 6: Wheel Rebuild

Embarrassing to admit, I hadn’t appreciated how different a tubular rim is to a clincher before. The wheels I got for the “Dawes” are tubulars and really I need a reliable everyday rider that I can repair easily. So I’m going to take these rims off and rebuild the Superbe Pro hubs with clinchers. I should be able to sell the tubulars on eBay as they’re good rims (Ambrosio Synthesis Superpro and Mavic GP4).

Dunno if the old Rubino Competition tubular tyres are saleable though…

I have read online advice, spoken to friends and had a good look about and I’ve now ordered a pair of 700c Mavic Open Pro silver rims. Now I need to get some spokes. According to Spocalc I need 290mm spokes for this combo. I’ll probably order Sapim double butted online from www.sdeals.com or from SJS Cycles.

Just browsing about and found this blog about wheel building. There are a few useful pointers in there maybe. UPDATE: Or probably not….

Singlespeed Part 4: Cranks

When I was thinking of going 10 speed on the “Dawes” I had a rush of blood to the head and bought a set of Suntour Superbe Pro cranks with double chainrings. I had been thinking of getting something older like Williams steel cranks or similar, but I saw the Superbe Pros and thought they were beautiful. So I bought them. From New Zealand.

Suntour Superbe Pro Crankset

Suntour Superbe Pro Crankset

They ended up costing just under £60 delivered so not terribly cheap. I could have bought cheap one piece Stronglights for half that, although I was considering 10 speed so 2 chainrings were needed. But in the meantime I had also bought the wheels with Superbe Pro hubs so there is a bit of a classic Suntour theme developing here.

Anyway when they arrived they were indeed as beautiful as they looked on the eBay ad (damn you eBay). But the original Sugino chainrings have clearly done a lot of miles and look quite sharkfin like. One had even been put back on wrong way round. It must have changed like a pig.

But by the time they arrived I’d made the singlespeed decision so I needed to fit a new chainring anyway. I’ve been half looking about and today found the chainring I want. I stumbled across Velosolo‘s web site a while back and had meant to go back and look at their chainrings when I had a chance.

Velosolo Chainrings - Photo by Velosolo

Velosolo Chainrings - photo by Velosolo

I reckon these look fab. I probably prefer the gold, the hint of “bling” is possibly just the right touch and may go nicely with the metallic light blue I’m considering for the frame. I think the black may look a bit heavy and out of place as there’ll be no other black apart from the tyres and even they have yellow gum walls.

I wasn’t sure which size chainrings I should be getting but Velosolo have an excellent FAQ section which in turn linked to Sheldon’s B.C.D. explanation – clear and succinct as ever. I now know that the Superbe Pros have a 130mm BCD based on the spacing of 76mm between adjacent chainring bolts.

I like the styling of the Velosolo chainrings and I also like the look and evident quality. And they are British made. Their kit has had a lot of positive comments online and it’s a bit exclusive. But surprisingly, not expensive at a flat £29.95 + £2.50 postage.

After reading their advice on chain widths I’m now considering that it may make sense to go for the wider 1/8″ chainring rather than 3/32″ as it has more driving face and will therefore wear better. I haven’t yet bought rear cogs (or a chain) so I could do this, and maybe the rear cog matters less anyway, it’s cheaper to replace.

So, I’ll muse on this and order the chainring soon once I have decided how many teeth. Then I need to start playing with chainlines and make sure the bottom bracket I have is the right spacing. Luckily (and it was luck not planning) it seems that Campy bottom brackets are the correct taper for Suntour (ISO or near enough) whereas Shimano use JIS, a different taper. Nice one. That means there is a very good chance my “free” BB will do the trick.

Gah… just noticed that Velosolo also sell these little beauties. Another fiver but what a stunning chainring. Less bling, more class I reckon.

A further footnote… I just weighed the Suntours. With double chainrings still fitted they come in at 610g. That’s 50g LESS than the Campagnolo Centaur double crankset I just fitted to the Bianchi. Not bad for 20+ year old technology.

Singlespeed Project Part 3: Brakes and Bits

OK, so I have the classic steel frame (thought to be Dawes) and the 700c wheels to go in it. Having cleared the old 7 speed block off the rear wheel I wanted to see how it would all go together.

Paul lent me a spare 14t steel cog he had, and a 24TPI lockring off an old bottom bracket (another Sheldon tip). For a poor man’s fixie they lock together on the hub nicely, exactly matching the available thread on the hub.

Fixed cog and lockring

Fixed cog and lockring

I’m being wary, and taking note of Sheldon’s advice on these DIY fixies and will have a rear brake, but I reckon with loctite and a firm twist with the spanner and chain whip it’ll be locked pretty good – the thread quality on the Superbe Pro hub is very high and can take a fair amount of torque.

So to get a feel for how the bike will come together I’ve fitted the wheels into the frame. I’ll have to re-dish the rear wheel with the fixie cog as I’ve re-spaced it to sit more centrally, but I’ll leave that till I get the cranks on and the chainline sorted. I picked up a low priced but nicely finished 1 inch threaded “Cranium” alloy threaded headset from SJS Cycles – these guys have a decent range of well priced kit generally.

I also got a lovely “new old stock” 130mm x 1″ alloy stem by the legendary TTT which goes nicely with my original Dawes aluminium drop bars (circa 1960’s I think due to the oldfashioned “Made in England” engraved detailing). I had to scrub off the painted on TTT logo though, too many logos all close together just looked a bit naff.

Handlebar detail

Handlebar detail

It is going to take some careful polishing to get the scratches out of the old engraved emblems on the bars.

So now I’ve loosely fitted the headset (hand tight only), stem, bars and wheels. I can see that it’s going to look very nice with the slender 700c wheels. It’s a longish wheelbase and with the thin tubing it looks sleek and elegant even with the rubbish paint. The new bits of polished alloy dress it up nicely.

Singlespeed rough assembled

The first rough assemble

With that in place I’ve now measured the brake clearances and I can see I’ll need a longer reach set of calipers, particularly on the rear. The front is 53mm and the rear is about 67mm. I had already decided not to use the old Weinmann centre pull calipers I got a while ago as although correct for the vintage the centre pull cables look ugly. Plus I think the calipers are too widely spaced for the more modern rims.

So I’ve browsed around and it seems there are a few modern dual pivot calipers with extra reach, for exactly this situation (frame built for 27″ wheels converted to 700c). Thankfully also these are not terribly expensive. They are:

  • Tektro R556 – approx £43.00 for a pair
  • Acor – approx £24.00 for a pair
  • Alhonga – Around £23.00 a pair

All look reasonable, the Tektro’s are nicest as they have a quick release but I’m keeping the budget down so I’m going for the Acor which has the best range for my frame at 53-73mm. I’ve ordered the rear for now and if I’m happy with it I’ll get the front one.